Document Store
The document store is a one of the core component of the IDP where users have the ability to engage with their PDF, PNG, JPG, and TIFF files, allowing for the extraction of diverse forms of text data. This encompasses tables, forms that contain key-value pairs, as well as signatures. The files that have been processed through the document store can be utilized for additional operations using process flows.
How to create a Document Store?
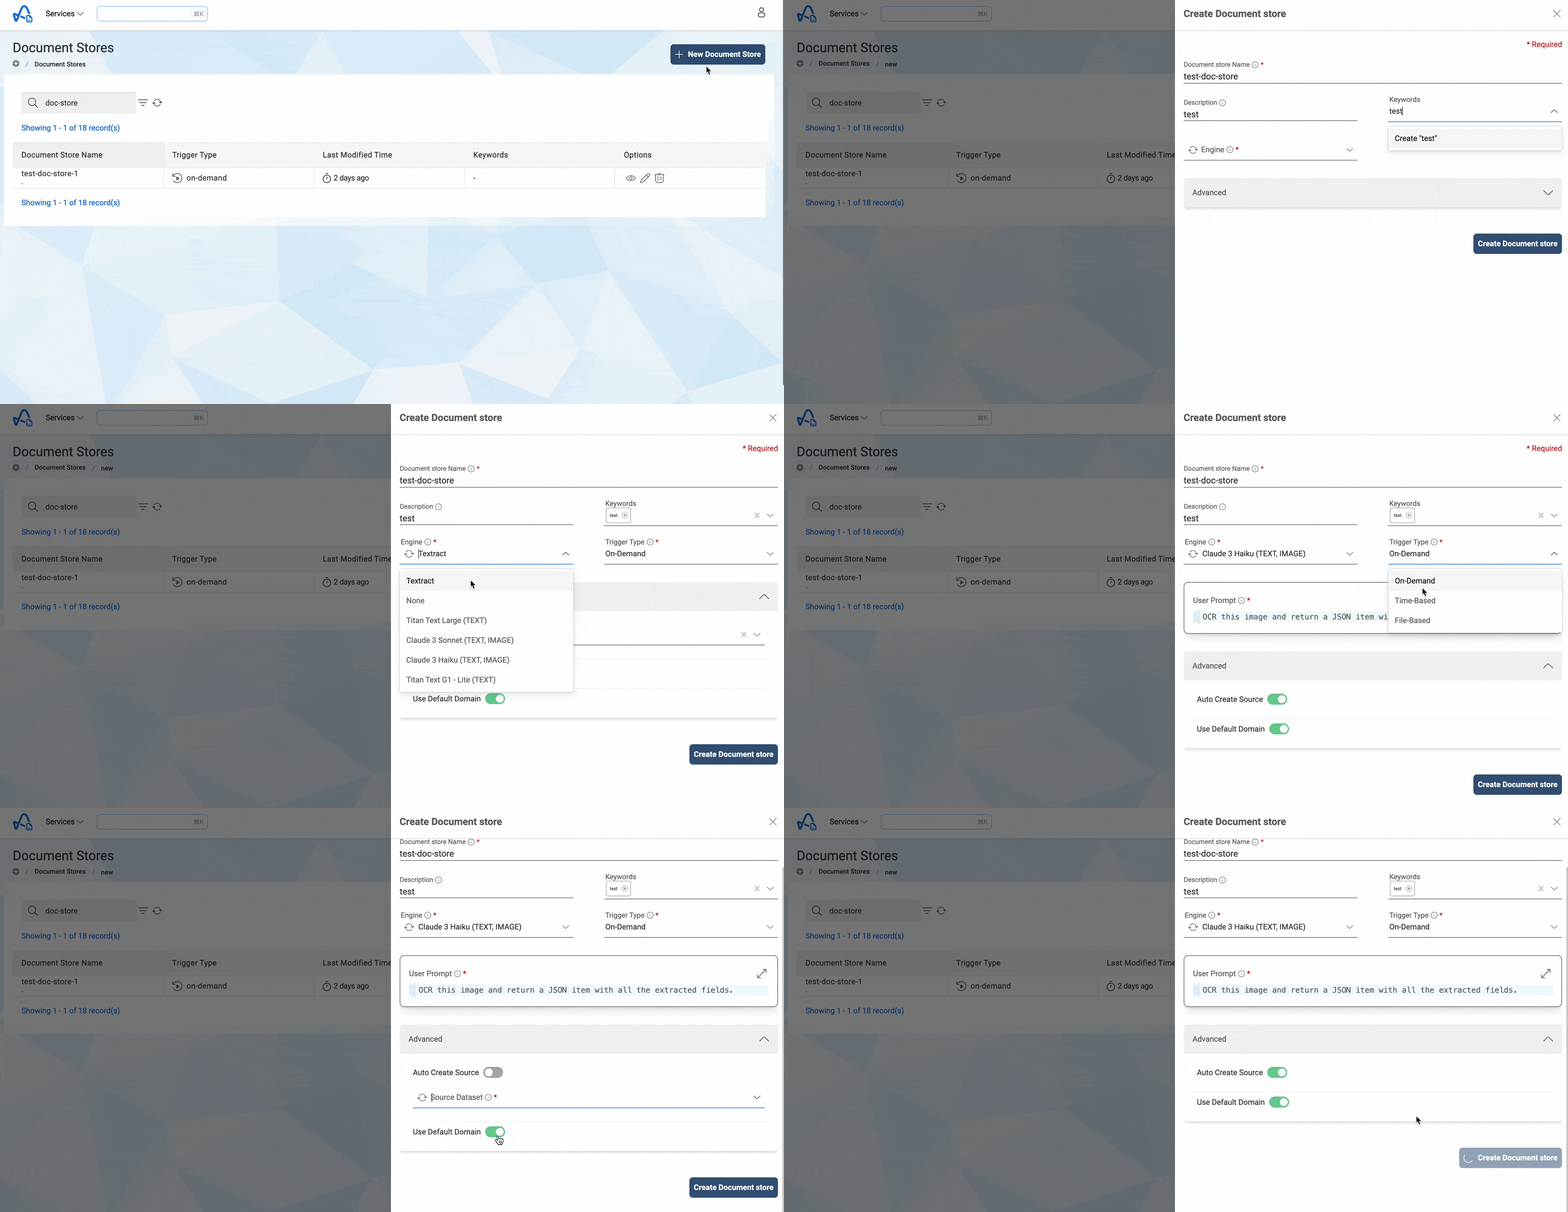
- Select Document Store from the Services in the top left corner and Click on
+ New Document Store - Fill in the required fields (Details listed below) and click on
Create Document Storebutton.
Following fields are needed to create an Document Store:
| Properties | Details |
|---|---|
| Document Store Name | A name for the Document store. This should be unique across the platform. |
| Engine | The type of Engine which will be used for processing files in the document store. Can be broadly of 3 types:
|
| Trigger Type | This field is applicable only if Engine is not None. There are three trigger types:
|
| Schedule Expression | Time-Based trigger type require a schedule expression. i.e., Every 15 min, daily, etc. Read more |
| Description | Description of the Document Store being created. |
| Keywords | Keywords indexed & searchable in app. Choose meaningful keywords to flag related stores & easily find them later. |
| Features | This field is applicable only if engine is Textract. Types of features that user wants to enable for Document Store: FORMS, TABLES, SIGNATURES. |
| User Prompt | This field is applicable only if engine is selected as one of the enabled Models. This prompt is passed on to the model for extracting required information from the uploaded files. |
| Auto Create Source | Enabling this option allows user to auto-create the Source Dataset required for the Document Store or user can choose a Source Dataset from the list of their Amorphic datasets by disabling this option. |
| Use Default Domain | Amorphic dataset for Document Store will be created in default domain by enabling this option or user need to choose a different domain in Amorphic. |
Below image shows how to create a new Document Store
After its creation, you cannot modify the Name, Source Dataset, or Domain of a Document Store.
Documents that undergo processing in Document Store without any features will be labeled as "completed," even though OCR results are not present.
If a model is selected as the document store's engine, it must support images as an input modality. For non OpenAI models the application will showcase this information.
Also note models are only capable of extracting key-value pairs and tabular data.
How to import files into Document Store?
User can run OCR process on documents after uploading them to Document Store. There are two ways to import files into Document Store.
1. From an existing Amorphic dataset
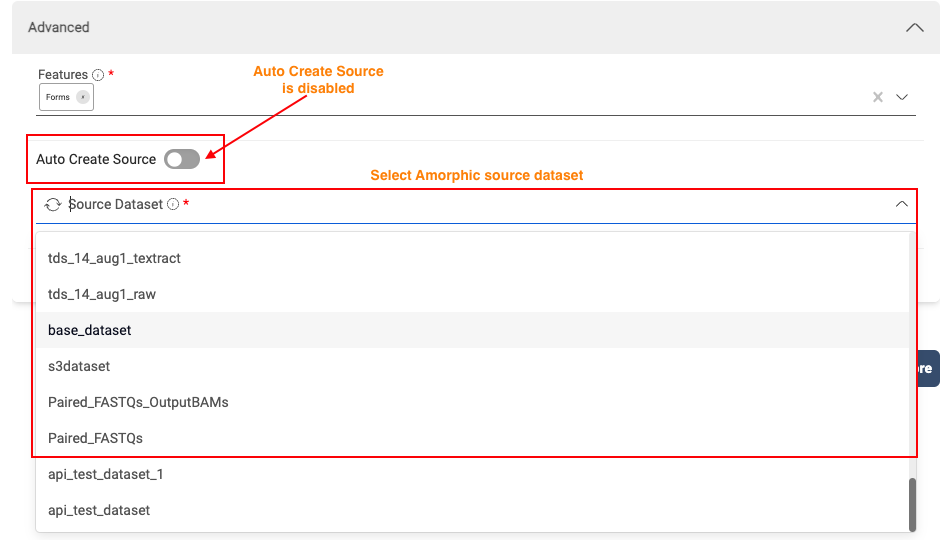
User can import files from an existing Amorphic dataset to Document Store by specifying the source dataset at the time of Document Store creation.
To import files from an Amorphic source dataset, disable Auto Create Source in the Advanced options and select a Source Dataset at the time of Document Store creation.
All the files metadata in the Amorphic source dataset will be imported into the Document Store after the completion of store creation and this will be an asynchronous process.
2. By manual file upload
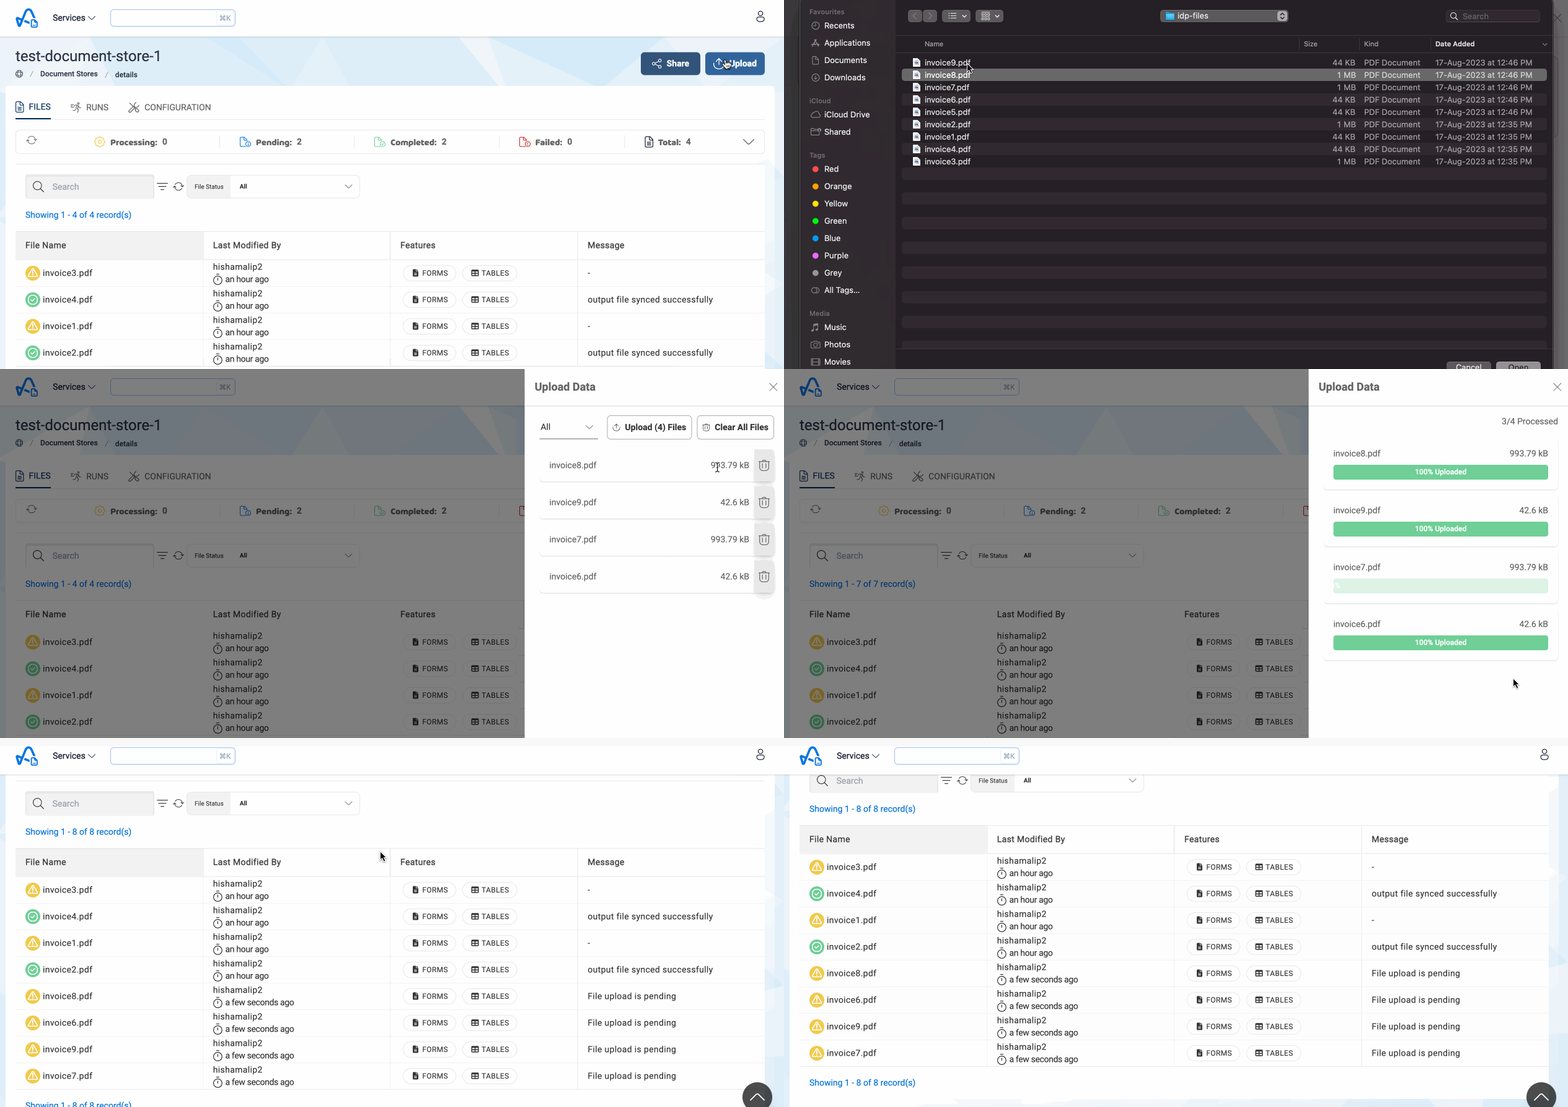
User can also upload files to the Document Store whenever it required. To upload files to the Document Store follow below steps:
- Select the Document Store that you want to upload files to and click on the
Uploadin the top right corner. - Add the files that you want to upload and click the
Upload(n) Filesbutton. All the files will be uploaded into the Document Store.
Below image shows how to upload files to the Document Store
How to Run a Document Store?
There are 3 ways to run a document store based on the Trigger-Type.
- On-Demand
- File-Based
- Time-Based
1. On-Demand
As the name suggests, users can run On-Demand Document Stores whenever they want.
Following are the step to run a document store on-demand.
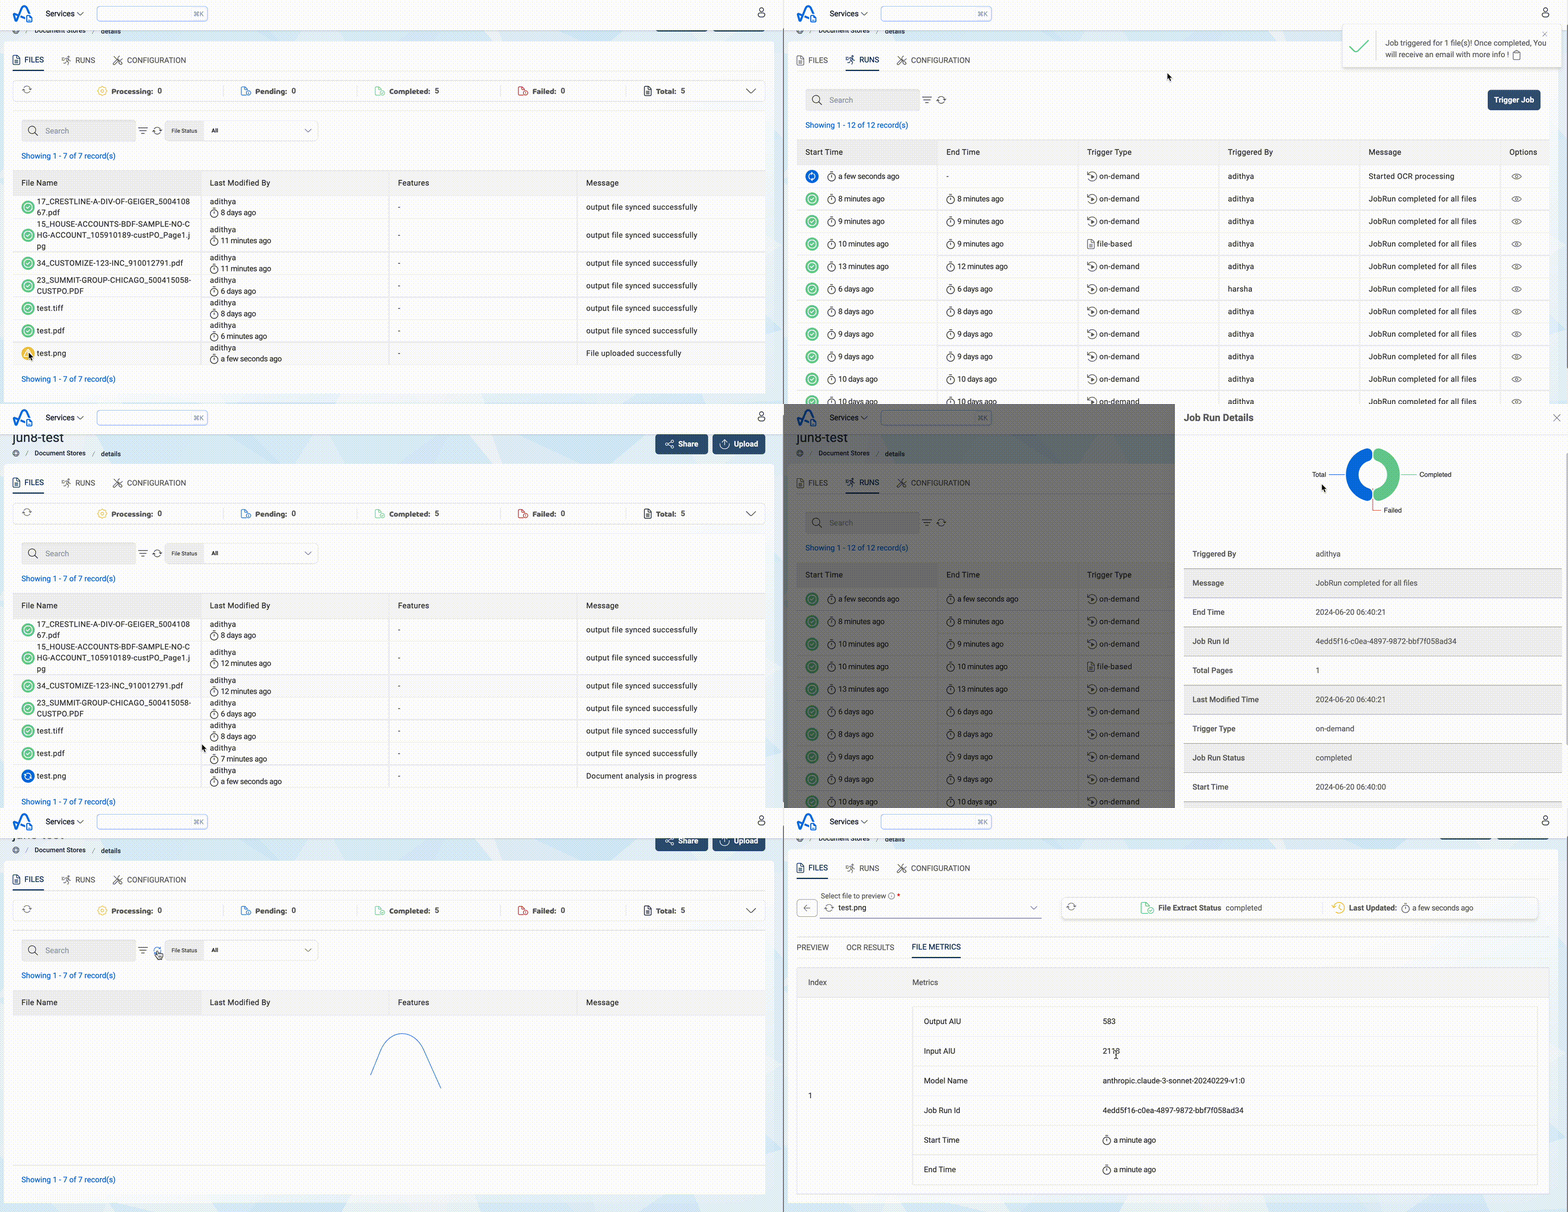
- Select the document store you want to run and click on the
RUNStab. - Click on the
Trigger Jobbutton and select the FileType from the drop-down list. - The FileType can be any of the following:
- All Files: OCR operation will run on all files except already processing files.
- Select Files: User can select a list of files to be picked up. All the files in that list will be picked for OCR operation except already processing files.
- Latest Files: OCR operation will run only on the pending files.
- Failed Files: OCR operation will run only on the failed files.
- Click on the
Trigger Runbutton and to start the Document Store run.
After the completion of Document Store run, user will get an email with all the details of that run. If the run was made using a Model as the Engine, then model usage related information will be present at both the run level and file level. The model usage is represented by Input and Output AIUs(Amorphic IDP Units).
Below image shows how to run a Document Store
2. Time-Based
Users have the option to schedule the execution of a Document Store. Document Stores with the Trigger-Type set as Time-Based will automatically run according to the specified schedule expression.
3. File-Based
If the Document Trigger type is File-Based, then whenever a file is uploaded to the Document Store, it'll trigger a new run on that document store automatically.
There will be a new run for each file uploaded to the Document Store, i.e., if user upload 50 files to the Document Store, it'll trigger 50 new runs.
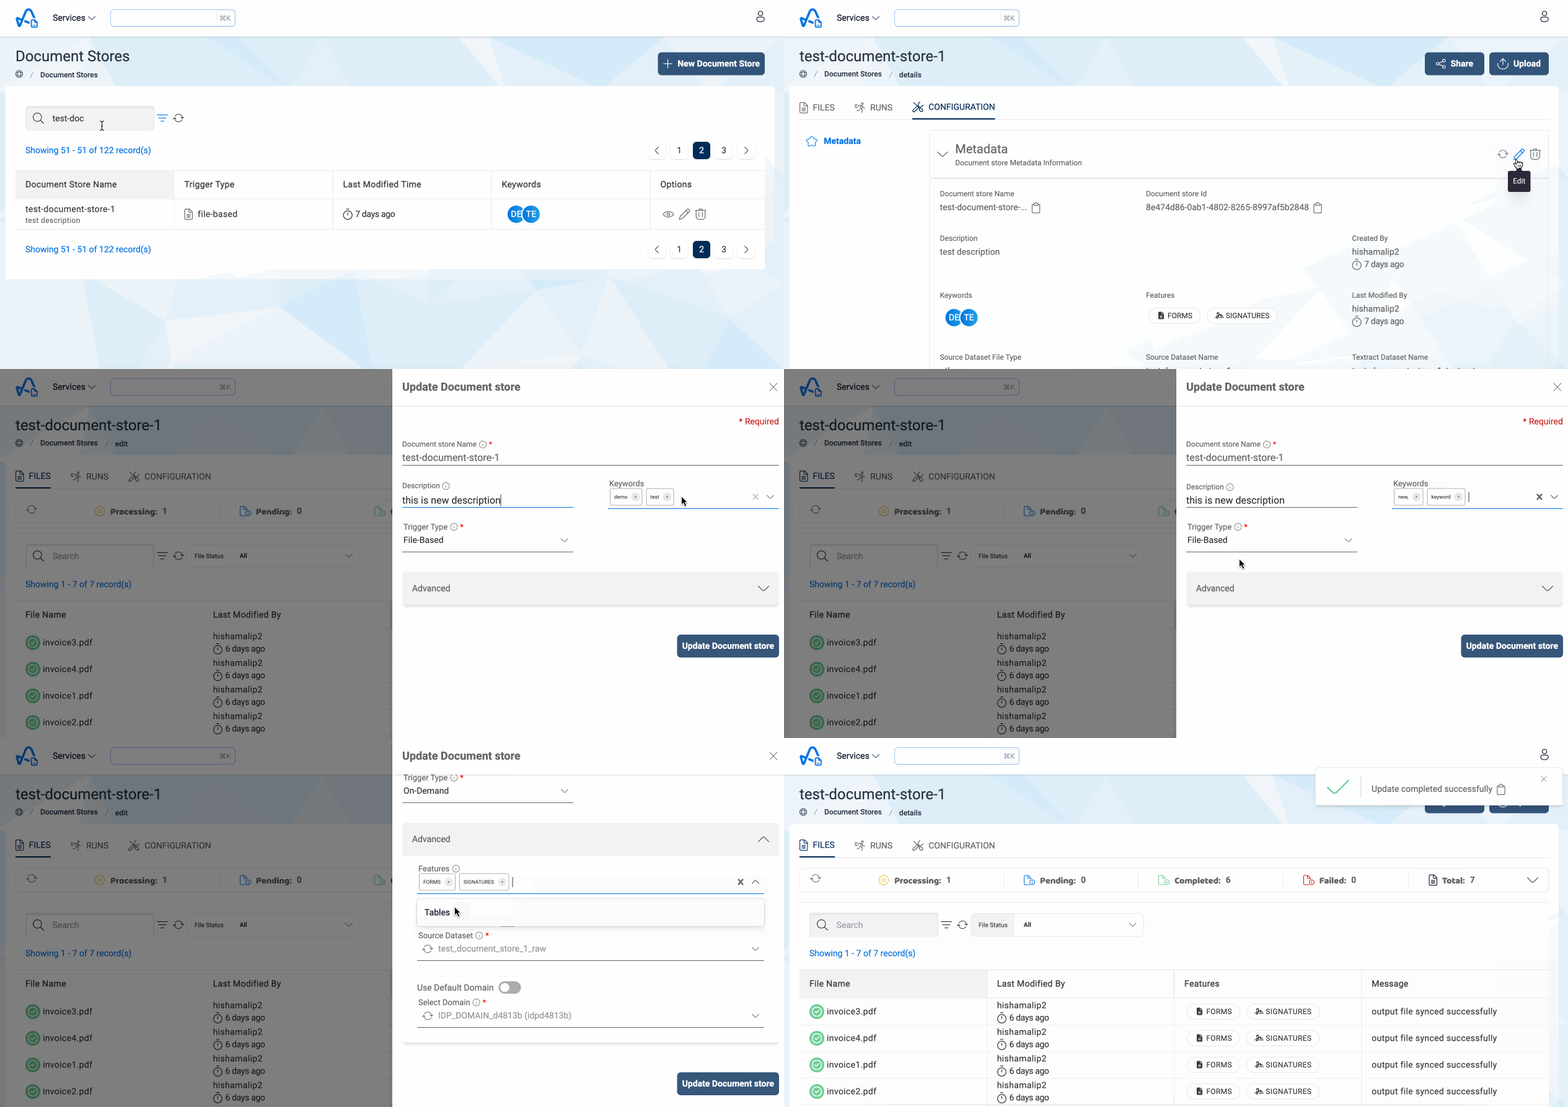
How to edit a Document Store?
User can edit details of a Document Store after the creation of that Document Store.
- Select the Document Store you want to edit and click on
CONFIGURATIONtab. - Click on the edit icon in the Metadata and update the required details then click on
Update Document Storebutton.
Below image shows how to edit a Document Store
How to re-sync source dataset files?
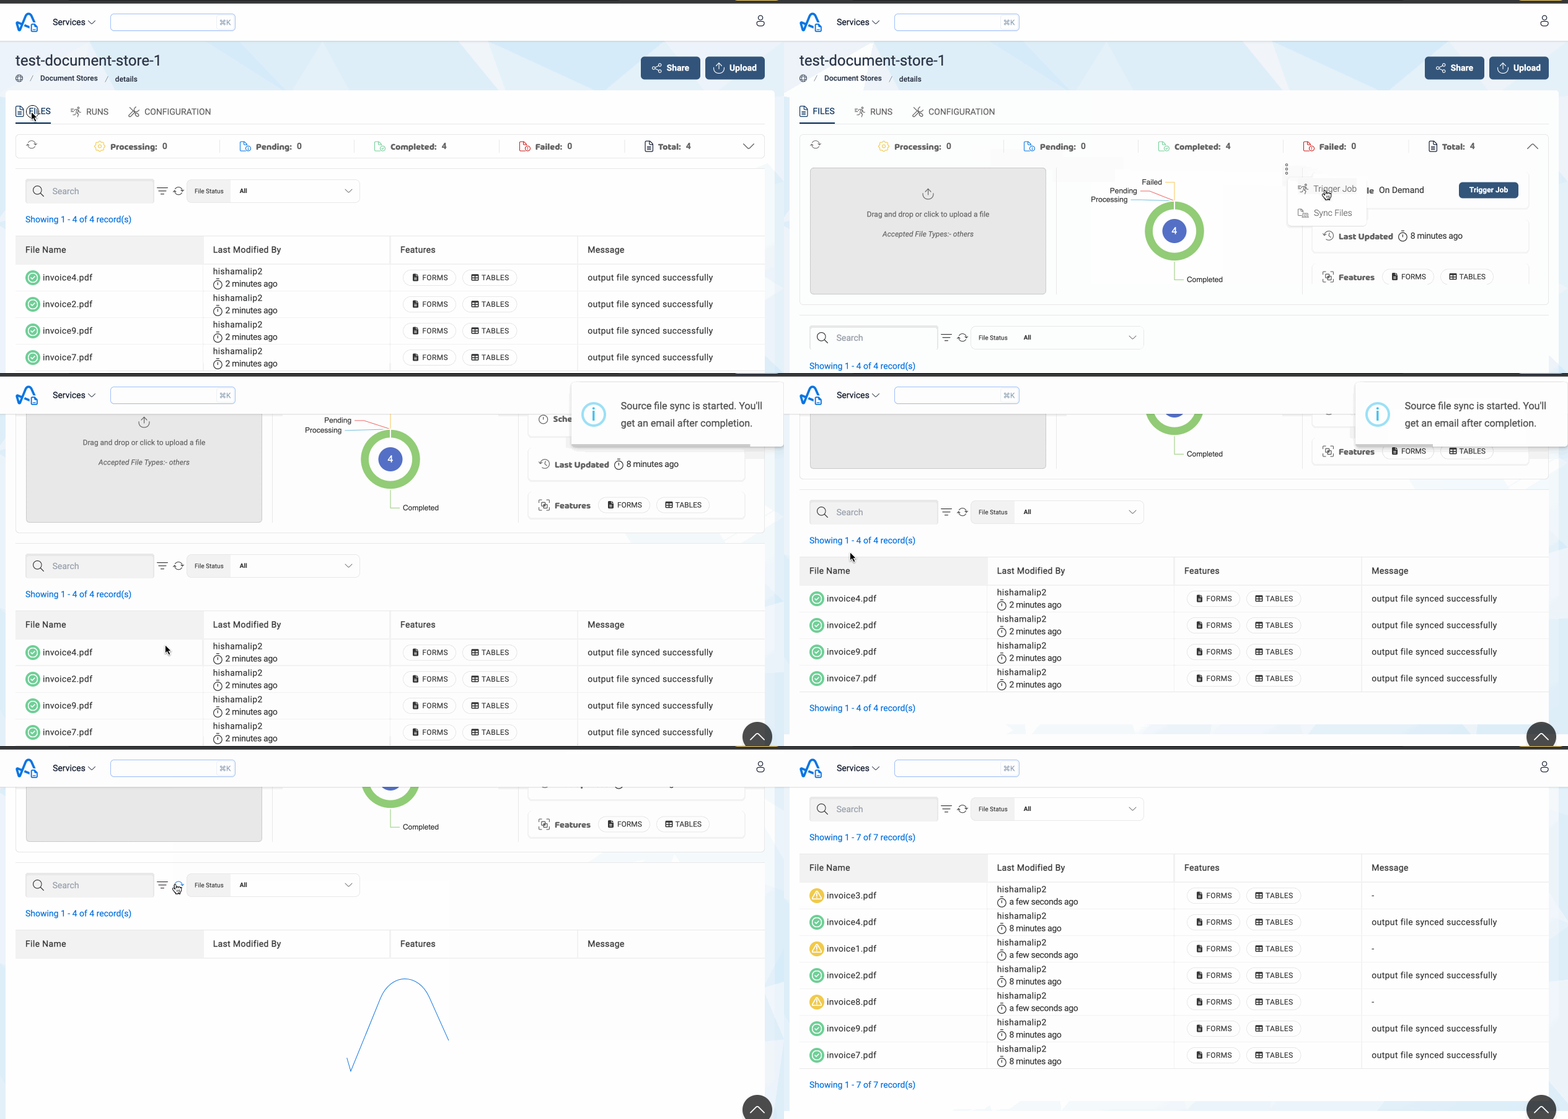
User have the option to sync back the files in the source Dataset to Document Store if there are any files in the source Dataset are missing from Document Store. This will be an asynchronous process and user will get an email with details of files that synced back to the Document Store after the completion of this process.
- Select the Document Store and click on
FILEStab. Click on the accordion to expand more details. - Click on the '3 dots' next to the files Stats chart and click on the
Sync Filesbutton and thenConfirmto start the file syncing process.
Below image shows how to sync back the files in the source Dataset to Document Store
How to share a Document Store?
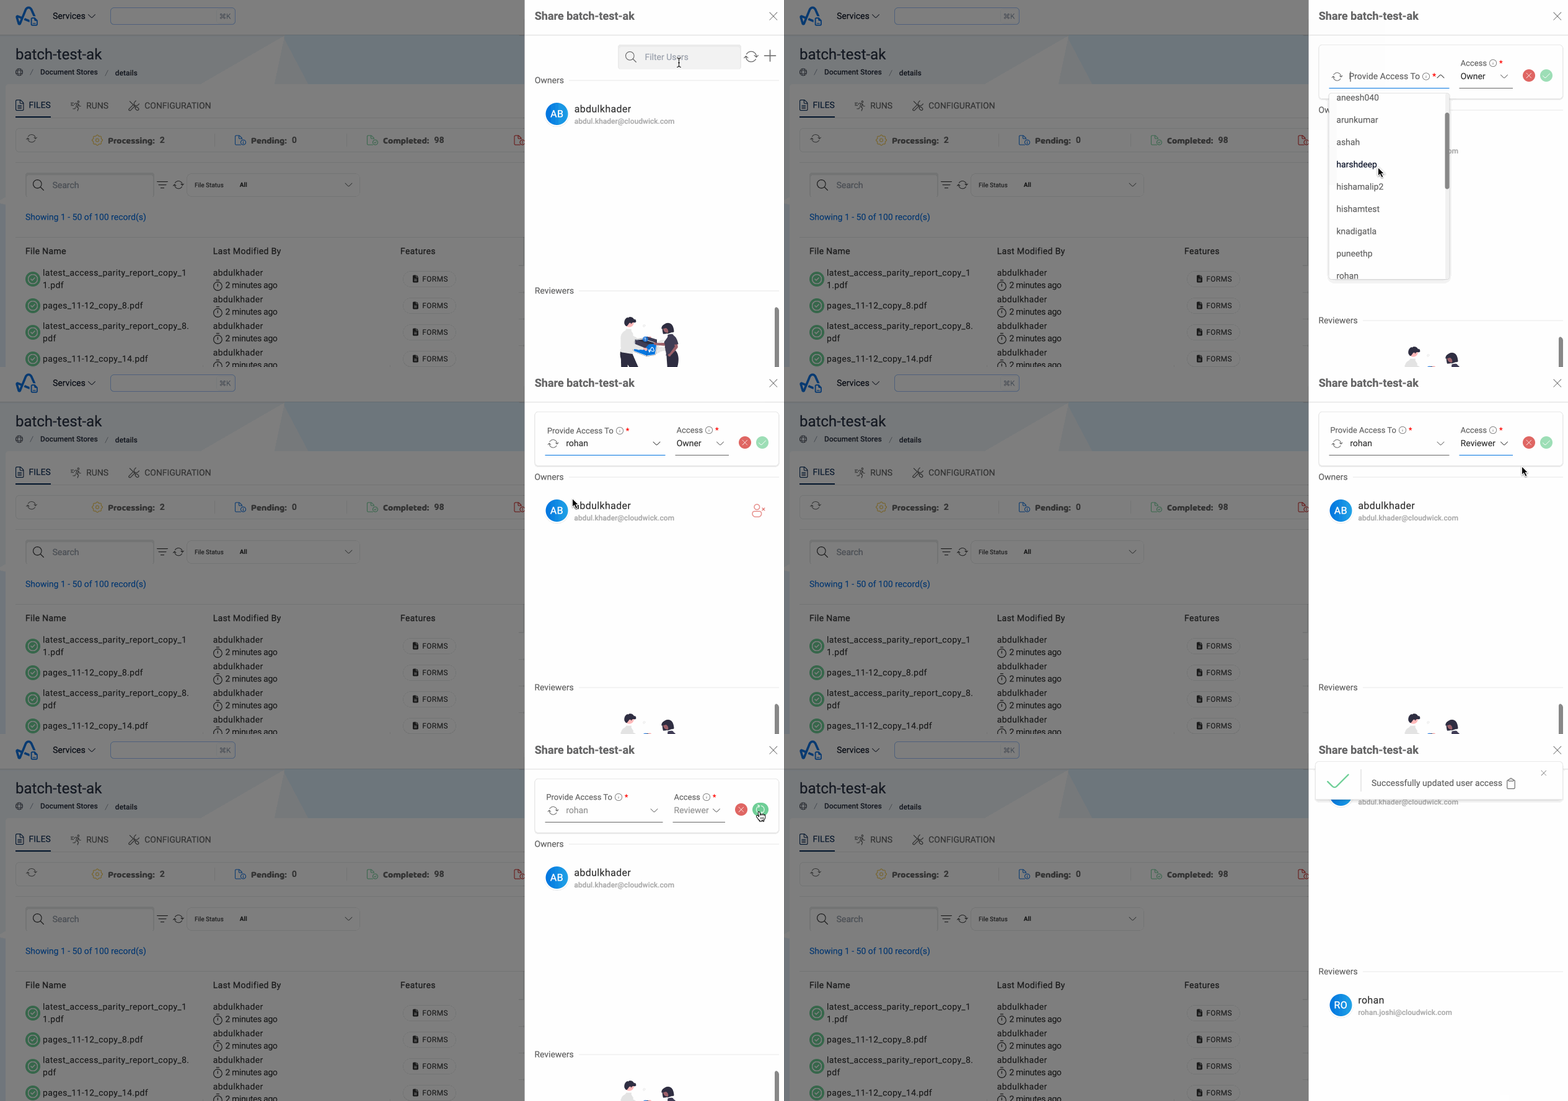
Owners of the Document Store can share it with other users in the IDP. There are two types of access control for Document Store, Owner Access and Reviewer Access. Owners of the Document Store can do any operation on those Document Stores(run, upload file, edit etc.) whereas the reviewers can only view the Document Store.
To share a Document Store with other users in the IDP, follow these steps:
- Select the Document Store that you want to share and click on
Sharebutton in the top right corner. - Click on the
+(Provide Access) button. - Select the username of the user to whom you want to share the Document Store with and also select the access type(Owner or Reviewer) and click submit button.
Below image shows how to share a Document Store with other users.
How to delete a Document Store?
Users can delete a Document Store when there are no ongoing runs currently associated with that Document Store. Follow these steps to delete a Document Store:
- Select the Document Store that you want to delete and go to
CONFIGURATIONtab. - Click on the delete icon in the Metadata section and click on the Delete Document Store button to confirm the deletion.
User can't delete a Document store that are associated with a Process Flow. To delete these Document Store, user needs to delete the Process Flow first. Read more
Below image shows how to delete a Document Store
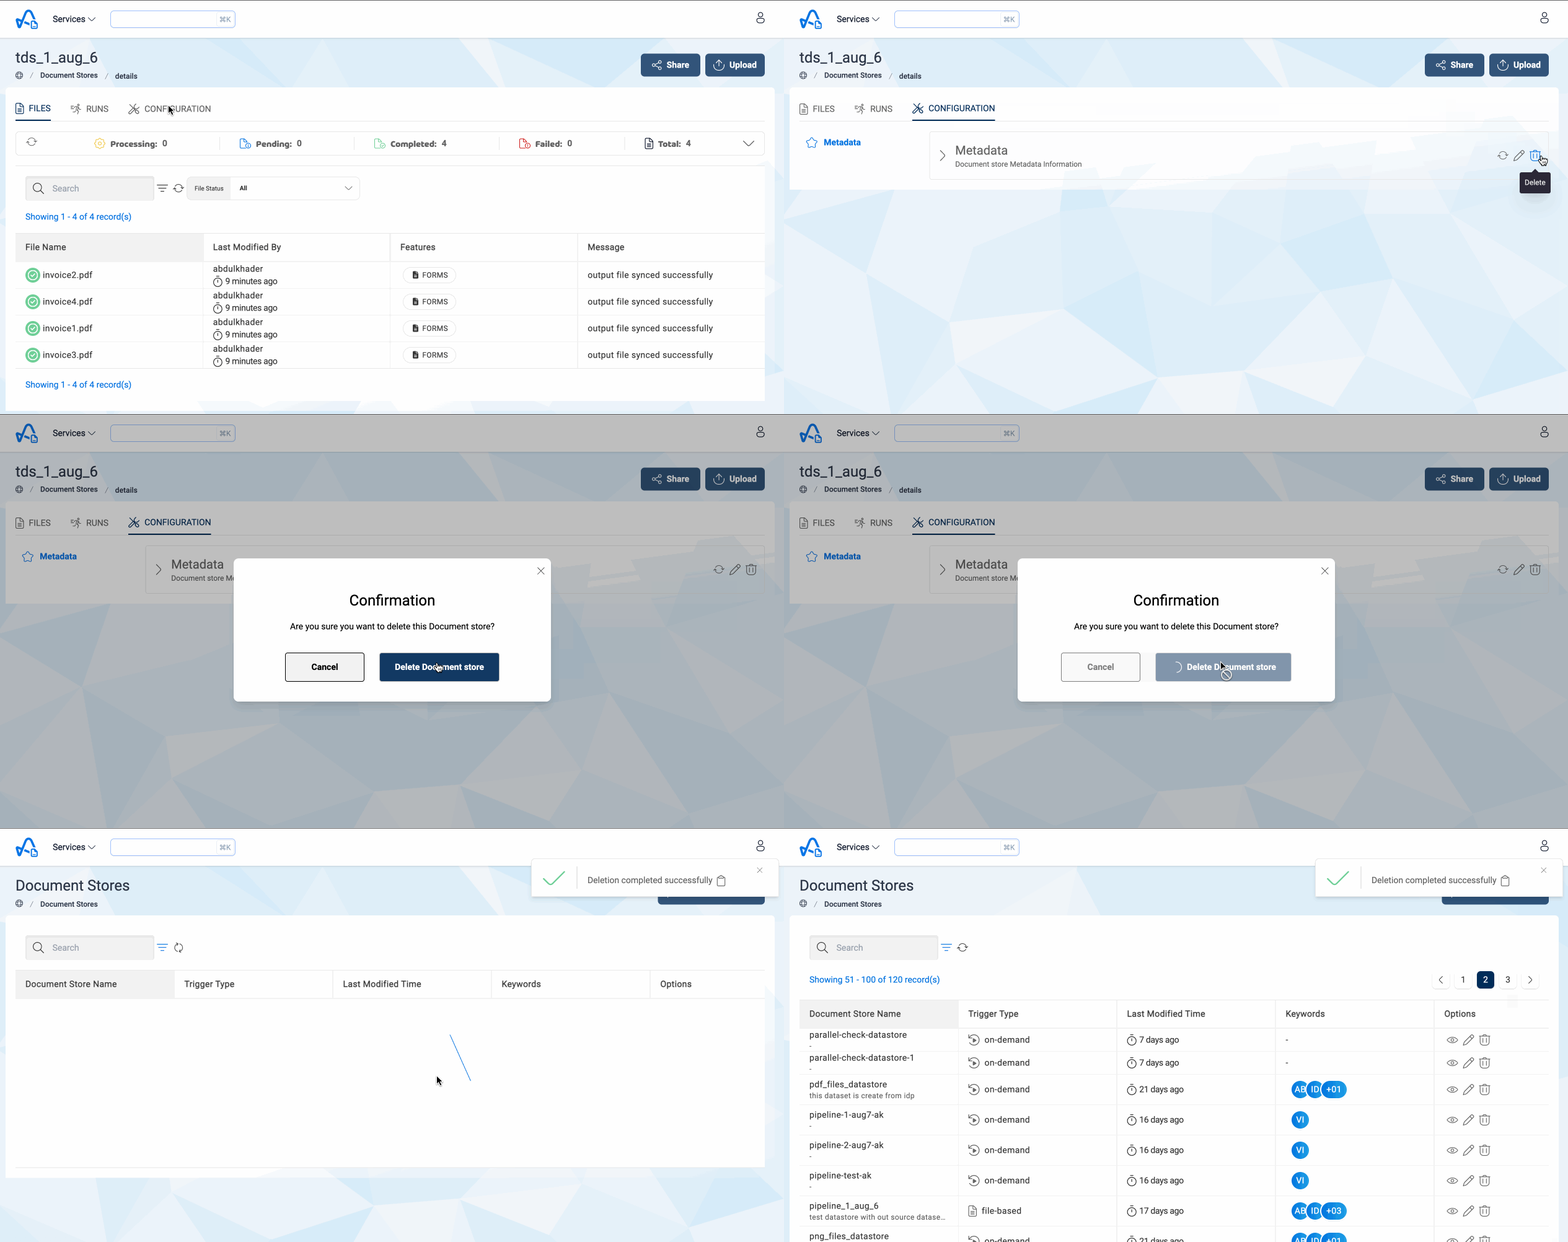
Deleting the Document Store will exclusively remove all the Document Store-related metadata from IDP. The datasets created as part of the Document Store will still remain in Amorphic.